-
SharePoint Viewers Feature
Want to see who has viewed a document in SharePoint Online? There is a SPWeb scoped feature called “SharePoint Viewers”. Turn it on.

You can now see the viewers listed in the file details pane.

-
How to customize list form layout using PnP PowerShell
If you click on configure layout

Click save and inspect the network calls we see that a MERGE request is made to the content types attached to the list (list content type).

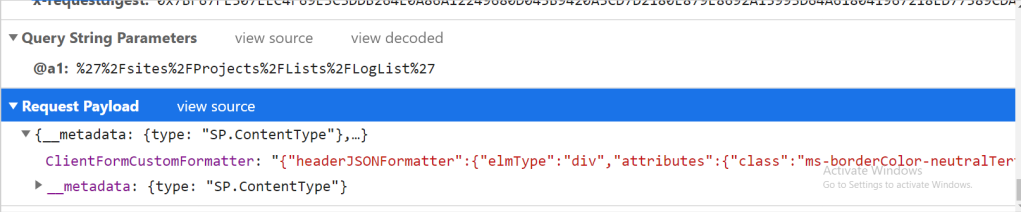
If we inspect this call and look at the request payload we can see the JSON that the endpoint expects:
I have taken the sample JSON given at this Microsoft site: https://docs.microsoft.com/en-us/sharepoint/dev/declarative-customization/list-form-configuration
We can see that the JSON that I had entered in the SharePoint UI is enclosed within ClientFormCustomFormatter property and it is stringified. I took it over to PowerShell to process the stringified JSON that is required.
In Chrome, I clicked on view source and copied the whole payload. I then pasted the payload in the customJSON variable defined in the PowerShell below. After it was converted to an object I retrieved the internal JSON with $parsed.ClientFormCustomFormatter

{
  "headerJSONFormatter": {
    "elmType": "div",
    "attributes": {
      "class": "ms-borderColor-neutralTertiary"
    },
    "style": {
      "width": "99%",
      "border-top-width": "0px",
      "border-bottom-width": "1px",
      "border-lef t-width": "0px",
      "border-right-width": "0px",
      "border-style": "solid",
      "margin-bottom": "16px"
    },
    "children": [
      {
        "elmType": "div",
        "style": {
          "display": "flex",
          "box-sizing": "border-box",
          "align-items": "center"
        },
        "children": [
          {
            "elmType": "div",
            "attributes": {
              "iconName": "Group",
              "class": "ms-fontSize-42 ms-fontWeight-regular ms-fontColor-themePrimary",
              "title": "Details"
            },
            "style": {
              "flex": "n one",
              "padding": "0px",
              "padding-left": "0px",
              "height": "36px"
            }
          }
        ]
      },
      {
        "elmType": "div",
        "attributes": {
          "class": "ms-fontColor-neutralSecondary ms-fontWeight-bold ms-fontSize-24"
        },
        "style": {
          "box-s izing": "border-box",
          "width": "100%",
          "text-align": "left",
          "padding": "21px 12px",
          "overflow": "hidden"
        },
        "children": [
          {
            "elmType": "div",
            "txtContent": "='Contact details for ' + []"
          }
        ]
      }
    ]
  },
  "footer JSONFormatter": {
    "elmType": "div",
    "style": {
      "width": "100%",
      "text-align": "left",
      "overflow": "hidden",
      "border-top-width": "1px"
    },
    "children": [
      {
        "elmType": "div",
        "style": {
          "width": "100%",
          "padding -top": "10px",
          "height": "24px"
        },
        "children": [
          {
            "elmType": "a",
            "txtContent": "='Contact Details for ' + []",
            "attributes": {
              "target": "_blank",
              "href": "='https://aka.ms/contacts?email=' + []",
              "c lass": "ms-fontColor-themePrimary ms-borderColor-themePrimary ms-fontWeight-semibold ms-fontSize-m ms-fontColor-neutralSecondary–hover ms-bgColor-themeLight–hover"
            }
          }
        ]
      }
    ]
  },
  "bodyJSONForma tter": {
    "sections": [
      {
        "displayname": "",
        "fields": [
          "Title"
        ]
      },
      {
        "displayname": "Details",
        "fields": [
          "Department",
          "Email",
          "Country"
        ]
      },
      {
        "displayname": "Application",
        "fields": [
          "Application Id",
          "A pprover",
          "Reviewer"
        ]
      }
    ]
  }
}
This is the structure that we need when using PnP PowerShell. Visually, it looks like this:

We can save this structure in an external JSON file and retrieve in the contents in PowerShell. The code for PnP is below:
$SiteURL = ""
$username = ""
$password = "" | ConvertTo-SecureString -AsPlainText -force

$cred = new-object -typename System.Management.Automation.PSCredential -argumentlist $username, $password
Connect-PnPOnline -Url $SiteURL  -Credentials $cred -ErrorAction Stop

$layoutJson = get-content -LiteralPath C:\users\pscred\documents\ListLayoutPowerShell_json.json

$list = Get-PnPList LogList -Includes ContentTypes

$listContentType = $list.ContentTypes | Where-Object {$_.Name -eq "Item"}
$listContentType.ClientFormCustomFormatter = $layoutJson
$listContentType.Update($false)
$listContentType.Context.ExecuteQuery()
To learn more about layout customization, please refer to: https://docs.microsoft.com/en-us/sharepoint/dev/declarative-customization/list-form-configuration
-
PnP PowerShell to set conditional formatting on modern form
$formula = "=if((substring([{0}],indexOf([{0}],';#')+2,1000) == 'Approved' || substring([{0}],indexOf([{0}],';#')+2,1000) == 'In Process', 'true', 'false')" -f '$Status'

$SiteURL = ""
$ListTitle=""
$username = ""
$password = "" | ConvertTo-SecureString -AsPlainText -force
$cred = New-Object -typename System.Management.Automation.PSCredential -argumentlist $username, $password
Connect-PnPOnline -Url $SiteURL  -Credentials $cred -ErrorAction Stop


$field = Get-PnPField -List $ListTitle -Identity "Field_Internal_Name_Where_To_Apply_This_Formula" -ErrorAction Stop
$field.ClientValidationFormula = $formula
$field.Update()
This is straightforward but wanted to share this. Some things to note:
- Provide the SiteURL, ListTitle, username and password in the script above
- If you want to connect using alternate instead of username and password you can do so
- The $formula variable uses a field with internal name Status to be checked in the formula
- The Status field in the above use case is a lookup field.
- Where it says “Field_Internal_Name_Where_To_Apply_This_Formula” provide your field name where the formula will be applied
-
Using client credential flow to authorize requests and call Power Automate Web API
In this quick hypothetical scenario, I will demonstrate how to authorize requests using client credentials and provision a Power Automate flow. The concepts I am demonstrating are how to authorize requests and then use the Power Automate Web API.
I will use a manual trigger and compose a HTTP request using the HTTP connector and post a request to /token endpoint. The action looks like this:

This will return an access token which I will retrieve and pass in the Authorization header in the next HTTP action. The access token can be retrieved using: @{body(‘HTTP’)?[‘access_token’]}

This second HTTP action will post a request to the Power Automate Web API and create a flow in the Dataverse. The complete code for this action is shown below and you can copy and paste this directly into the action
{ "id": "13fadfda-8d2c-450e-850a-221dd059a7a4", "brandColor": "#709727", "connectionReferences": { }, "connectorDisplayName": "HTTP", "icon": "data:image/svg+xml;base64,PCEtLSBQbGVhc2UgbGV0IHRoZSBGbG93IHRlYW0ga25vdyBpZiB0aGlzIGNoYW5nZXMuIEl0IG5lZWRzIHRvIGFsc28gYmUgY2hhbmdlZCBpbiB0aGUgUG93ZXJBcHBzLVBvcnRhbCBmb3IgRExQIFBvbGljaWVzICgvc3JjL1BvcnRhbC9Db250ZW50L0ltYWdlcy9Db25uZWN0aW9ucy9odHRwLWNvbm5lY3Rvci1pY29uLnN2ZykgLS0+DQo8c3ZnIHdpZHRoPSIzMiIgaGVpZ2h0PSIzMiIgdmVyc2lvbj0iMS4xIiB2aWV3Qm94PSIwIDAgMzIgMzIiIHhtbG5zPSJodHRwOi8vd3d3LnczLm9yZy8yMDAwL3N2ZyI+DQogPHBhdGggZmlsbD0iIzcwOTcyNyIgZD0ibTAgMGgzMnYzMmgtMzJ6Ii8+DQogPGcgZmlsbD0iI2ZmZiI+DQogIDxwYXRoIGQ9Ik0yMS4xMjcgMTAuOTgyYy0xLjA5MS0xLjgxOC0yLjk4Mi0yLjk4Mi01LjE2NC0yLjk4MnMtNC4wNzMgMS4xNjQtNS4wOTEgMi45MDljLS41MDkuODczLS44IDEuODkxLS44IDIuOTgyIDAgMy4wNTUgMi4zMjcgNS41MjcgNS4yMzYgNS44OTF2MS4wMThoMS4zODJ2LTEuMDE4YzIuOTgyLS4zNjQgNS4yMzYtMi44MzYgNS4yMzYtNS44OTEgMC0xLjAxOC0uMjkxLTIuMDM2LS44LTIuOTA5em0tMS4wMTguNTgyYy0uNDM2LjIxOC0xLjA5MS40MzYtMS44OTEuNTgyLS4xNDUtMS4xNjQtLjQzNi0yLjEwOS0uODczLTIuNzY0IDEuMTY0LjM2NCAyLjEwOSAxLjA5MSAyLjc2NCAyLjE4MnptLTIuMjU1IDIuNGMwIC42NTUtLjA3MyAxLjIzNi0uMTQ1IDEuNzQ1LS41MDkuMDczLTEuMDkxLjA3My0xLjc0NS4wNzNzLTEuMjM2IDAtMS43NDUtLjA3M2MtLjA3My0uNTgyLS4xNDUtMS4xNjQtLjE0NS0xLjc0NSAwLS40MzYgMC0uODczLjA3My0xLjMwOS41ODIuMDczIDEuMTY0LjE0NSAxLjgxOC4xNDVzMS4yMzYtLjA3MyAxLjgxOC0uMTQ1bC4wNzMgMS4zMDl6bS0xLjg5MS00LjhjLjIxOCAwIC40MzYgMCAuNjU1LjA3My40MzYuNTA5Ljg3MyAxLjYgMS4wOTEgMi45ODItLjUwOS4wNzMtMS4wOTEuMTQ1LTEuNzQ1LjE0NXMtMS4yMzYtLjA3My0xLjc0NS0uMTQ1Yy4yMTgtMS4zODIuNTgyLTIuNDczIDEuMDkxLTIuOTgyLjIxOC0uMDczLjQzNi0uMDczLjY1NS0uMDczem0tMS4zODIuMjE4Yy0uMzY0LjY1NS0uNzI3IDEuNi0uODczIDIuNzY0LS44LS4xNDUtMS40NTUtLjM2NC0xLjg5MS0uNTgyLjY1NS0xLjA5MSAxLjYtMS44MTggMi43NjQtMi4xODJ6bS0zLjQxOCA0LjU4MmMwLS43MjcuMTQ1LTEuMzgyLjQzNi0yLjAzNi41MDkuMjkxIDEuMjM2LjUwOSAyLjEwOS42NTUtLjA3My40MzYtLjA3My44NzMtLjA3MyAxLjM4MmwuMDczIDEuNzQ1Yy0xLjE2NC0uMTQ1LTEuOTY0LS40MzYtMi40NzMtLjcyN2wtLjA3My0xLjAxOHptLjI5MSAxLjZjLjU4Mi4yOTEgMS40NTUuNDM2IDIuMzI3LjU4Mi4xNDUuOTQ1LjQzNiAxLjgxOC44IDIuNC0xLjQ1NS0uNDM2LTIuNjE4LTEuNTI3LTMuMTI3LTIuOTgyem01LjE2NCAzLjEyN2wtLjY1NS4wNzNzLS40MzYgMC0uNjU1LS4wNzNjLS40MzYtLjUwOS0uOC0xLjMwOS0uOTQ1LTIuNDczLjU4Mi4wNzMgMS4wOTEuMDczIDEuNjczLjA3M3MxLjA5MSAwIDEuNjczLS4wNzNjLS4yOTEgMS4xNjQtLjY1NSAxLjk2NC0xLjA5MSAyLjQ3M3ptLjcyNy0uMTQ1Yy4zNjQtLjU4Mi42NTUtMS40NTUuOC0yLjQuODczLS4xNDUgMS43NDUtLjI5MSAyLjMyNy0uNTgyLS41MDkgMS40NTUtMS42NzMgMi41NDUtMy4xMjcgMi45ODJ6bTMuMjczLTMuNTY0Yy0uNTA5LjI5MS0xLjMwOS41ODItMi40NzMuNzI3LjA3My0uNTA5LjA3My0xLjA5MS4wNzMtMS43NDUgMC0uNDM2IDAtLjk0NS0uMDczLTEuMzgyLjgtLjE0NSAxLjUyNy0uMzY0IDIuMTA5LS42NTUuMjkxLjU4Mi40MzYgMS4zMDkuNDM2IDIuMDM2LjA3My4zNjQgMCAuNjU1LS4wNzMgMS4wMTh6TTEzLjg1NSAyMS4xNjRoNC4yMTh2MS44OTFoLTQuMjE4ek0xOC4zNjQgMjEuNjczaDEuNTI3djEuMzgyaC0xLjUyN3pNMTEuOTY0IDIxLjY3M2gxLjUyN3YxLjM4MmgtMS41Mjd6TTE1LjIzNiAyMy40MThoMS4zODJ2LjU4MmgtMS4zODJ6Ii8+DQogPC9nPg0KPC9zdmc+DQo=", "isTrigger": false, "operationName": "HTTP_2", "operationDefinition": { "type": "Http", "inputs": { "method": "POST", "uri": "https://org5656100b.crm4.dynamics.com/api/data/v9.1/workflows", "headers": { "content-type": "application/json", "accept": "application/json", "Authorization": "Bearer @{body('HTTP')?['access_token']}" }, "body": { "category": 5, "statecode": 0, "name": "TEST FROM POWER AUTOMATE", "type": 1, "description": "This flow was created using PowerShell and Web API", "primaryentity": "none", "clientdata": "{\"properties\":{\"connectionReferences\":{\"shared_sharepointonline\":{\"runtimeSource\":\"invoker\",\"connection\":{\"connectionReferenceLogicalName\":\"new_sharedsharepointonline_696ff\"},\"api\":{\"name\":\"shared_sharepointonline\"}}},\"definition\":{\"$schema\":\"https://schema.management.azure.com/providers/Microsoft.Logic/schemas/2016-06-01/workflowdefinition.json#\",\"contentVersion\":\"1.0.0.0\",\"parameters\":{\"$connections\":{\"defaultValue\":{},\"type\":\"Object\"},\"$authentication\":{\"defaultValue\":{},\"type\":\"SecureObject\"}},\"triggers\":{\"manual\":{\"metadata\":{\"operationMetadataId\":\"f1388f31-5aed-46aa-b3aa-edfd7a3e665b\"},\"type\":\"Request\",\"kind\":\"Button\",\"inputs\":{\"schema\":{\"type\":\"object\",\"properties\":{},\"required\":[]}}}},\"actions\":{\"Get_items\":{\"runAfter\":{},\"metadata\":{\"operationMetadataId\":\"63c1adcc-4905-4a66-ab1d-b71dae3740d7\"},\"type\":\"OpenApiConnection\",\"inputs\":{\"host\":{\"connectionName\":\"shared_sharepointonline\",\"operationId\":\"GetItems\",\"apiId\":\"/providers/Microsoft.PowerApps/apis/shared_sharepointonline\"},\"parameters\":{\"dataset\":\"https://azurepscred.sharepoint.com/sites/Projects\",\"table\":\"541ff279-bf94-4f6b-a46f-633047d11cd2\",\"$top\":100},\"authentication\":{\"type\":\"Raw\",\"value\":\"@json(decodeBase64(triggerOutputs().headers['X-MS-APIM-Tokens']))['$ConnectionKey']\"}}}}}},\"schemaVersion\":\"1.0.0.0\"}" } }, "runAfter": { "HTTP": [ "Succeeded" ] }, "metadata": { "operationMetadataId": "f7ecfd54-baa6-4943-b35c-d1deb0a39388" } } } -
Expand all Power Automate actions
When working with Power Automate being able to expand all the actions with one click is a great feature. I searched for it and came across this excellent post on this.
I used the script and it works good. However, I always try to understand a script before executing it to clarify my own concepts and further my learning. Therefore, although I executed the above in the console to see it in execution, I wanted to also write my version. That allows me to better understand and learn.
My version is not as complete or as robust as the one I shared above but it is an attempt to understand. My script looks like this:
var allHeaders = document.getElementsByClassName("msla-card-title-group");
if(allHeaders.length > 0) {
	for(var i=0;i<allHeaders.length;i++) {
		if(allHeaders[i].getAttribute("aria-expanded") == "false") {
			allHeaders[i].click();
}
}
}
The script that I shared from Magnetism Solutions is robust and it runs for both collapsing and expanding. Mine just expands but it is sufficient to get work done for me. In my case, I have to run the script multiple times to ensure all the nested actions are also expanded (the script that I shared above takes care of that as well).
Running the script is not hard, just execute it as many times as you need and because I am checking whether the action is already expanded, running the script more than once will not collapse any actions.
Again I want to give shout out to the awesome script here https://blog.magnetismsolutions.com/blog/paulnieuwelaar/2020/05/27/expand-collapse-all-actions-for-microsoft-power-automate-flow that formed the inspiration for this blog.
-
Creating Power Automate Using Power Automate Web API
Recently on a number of projects I got a chance to explore Power Automate further. Increasingly it has become evident to me that the platform is extremely powerful; however, the capabilities and extension points extended to the developers are fairly rigid or not as streamlined. Managing to explore on it a bit I came across the Power Automate Web API. In all honesty, I knew about this in my casual reading of blogs and documentation across Microsoft. However, this API had slipped out of my mind. The project that I was on required some changes to the flows and having to manually modify some of those actions can become a real pain real quick. Therefore, I decided to explore this API and was left impressed.
One of the first things I did was to retrieve the list of workflows and then create a workflow using just PowerShell. Now, many would wonder why do I use PowerShell so much in much of my blogs. The reason is that it is easy to start to learn a technology using PowerShell without getting inundated with the quirks of other technologies which become a bottleneck when it comes to learning something. For example, I could have just used a SPFX or C# or may be even a flow to do what I did. However, using PowerShell I was able to concentrate on just the piece that I was interested in learning.
I began by registering a new app in Azure AD and assigned permissions as follows. I searched for dataverse and chose Delegated permissions shown below


After consenting to the permissions as an admin, I also had to add an application user in the dataverse environment which is done using the Power Platform Admin Center. I assigned the user System Administrator role. 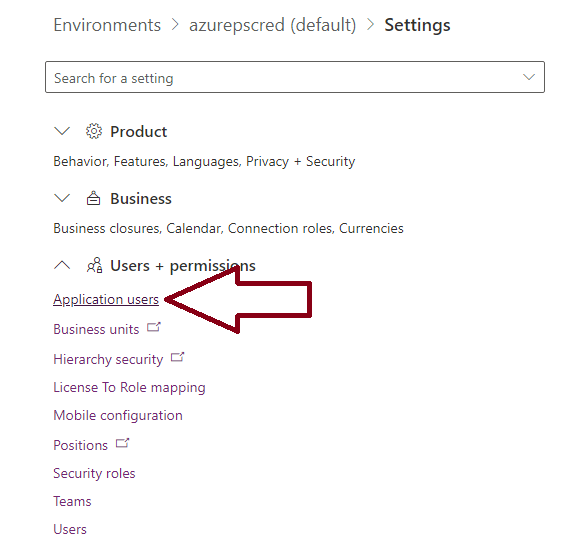

Note that I did some testing such as retrieving all the flows in the environment and played with it a bit to understand before I started to create a flow.
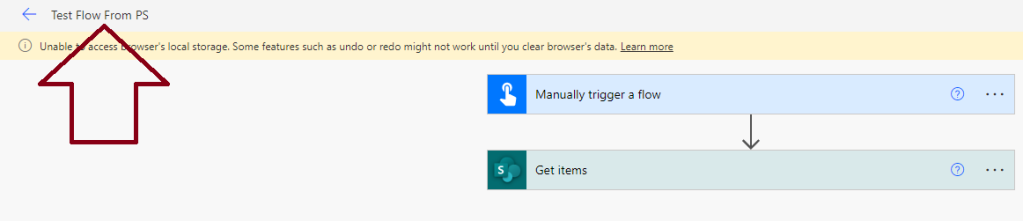
For my case, to create a flow, I began by creating a simple flow using the flow editor. This was just so I can get the flow JSON definition to re-use. Also note that the JSON definition that you get from the export-Flow is a bit different and did not work. I had to create a flow, retrieve it using the Web API and use that definition. The definitions from the export flow and this was a bit different.
Following is a screenshot of the flow. As can be seen, it is very basic because the intent is to just get the flow definition.

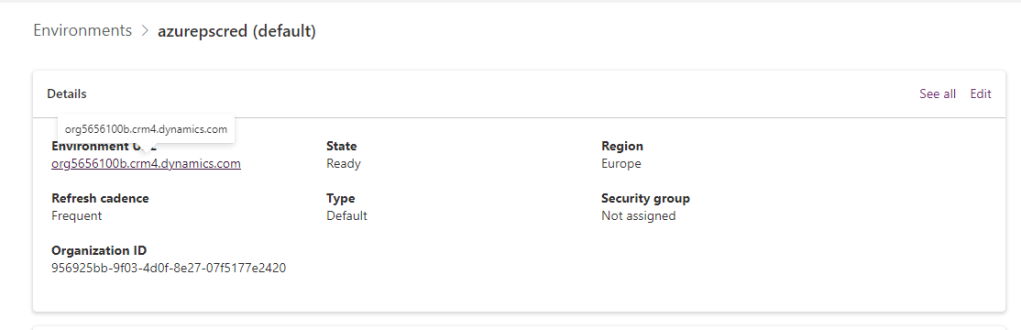
Next thing we also need is the endpoint URL which can be retrieve from the Power Platform Admin Center. Environment URL is what we need.
With this information I created the following PowerShell. Also notice the scope which is my URL with /.default appended.
$clientID = ""
$Clientsecret = ""
$tenantID = "azurepscred.onmicrosoft.com"


#Connect to GRAPH API
$tokenBody = @{
    Grant_Type    = "client_credentials"
    Scope         = "https://org5656100b.crm4.dynamics.com/.default"
    Client_Id     = $clientId
    Client_Secret = $clientSecret
}
$tokenResponse = Invoke-RestMethod -Uri "https://login.microsoftonline.com/$tenantID/oauth2/v2.0/token" -Method POST -Body $tokenBody
$headers = @{
    "Authorization" = "Bearer $($tokenResponse.access_token)"
    "Content-type"  = "application/json"
    "Accept"        = "application/json"
}


$URLsend = "https://org5656100b.crm4.dynamics.com/api/data/v9.1/workflows"

$allWorkflows = Invoke-RestMethod -Method GET -Uri $URLsend -Headers $headers
This gave me a list of all my workflows. To retrieve the one that I needed, I need the unique workflow id which I was able to retrieve after outputting the $allWorkflows to a variable, finding my workflow and then copying that ID. The property we need the most is clientdata. I retrieved it like this:
$dt=$allWorkflows.value | ? {$_.workflowidunique -like '5f101*'} | select clientDataRetrieving the clientdata property gave me the following JSON:

I then copied it to the clipboard using $dt | clip and escaped it. It is necessary to escape the JSON because we are going to pass this back in the PowerShell to create the flow. Below is the script that creates the flow: $clientID = "" $Clientsecret = "" $tenantID = "azurepscred.onmicrosoft.com" #Connect to GRAPH API $tokenBody = @{ Grant_Type = "client_credentials" Scope = "https://org5656100b.crm4.dynamics.com/.default" Client_Id = $clientId Client_Secret = $clientSecret } $tokenResponse = Invoke-RestMethod -Uri "https://login.microsoftonline.com/$tenantID/oauth2/v2.0/token" -Method POST -Body $tokenBody $headers = @{ "Authorization" = "Bearer $($tokenResponse.access_token)" "Content-type" = "application/json" "Accept" = "application/json" } $URLsend = "https://org5656100b.crm4.dynamics.com/api/data/v9.1/workflows" $BodyJsonsend = @" { "category": 5, "statecode": 0, "name": "Test Flow From PS", "type": 1, "description": "This flow was created using PowerShell and Web API", "primaryentity":"none", "clientdata": "{\"properties\":{\"connectionReferences\":{\"shared_sharepointonline\":{\"runtimeSource\":\"invoker\",\"connection\":{\"connectionReferenceLogicalName\":\"new_sharedsharepointonline_696ff\"},\"api\":{\"name\":\"shared_sharepointonline\"}}},\"definition\":{\"`$schema\":\"https:\/\/schema.management.azure.com\/providers\/Microsoft.Logic\/schemas\/2016-06-01\/workflowdefinition.json#\",\"contentVersion\":\"1.0.0.0\",\"parameters\":{\"`$connections\":{\"defaultValue\":{},\"type\":\"Object\"},\"`$authentication\":{\"defaultValue\":{},\"type\":\"SecureObject\"}},\"triggers\":{\"manual\":{\"metadata\":{\"operationMetadataId\":\"f1388f31-5aed-46aa-b3aa-edfd7a3e665b\"},\"type\":\"Request\",\"kind\":\"Button\",\"inputs\":{\"schema\":{\"type\":\"object\",\"properties\":{},\"required\":[]}}}},\"actions\":{\"Get_items\":{\"runAfter\":{},\"metadata\":{\"operationMetadataId\":\"63c1adcc-4905-4a66-ab1d-b71dae3740d7\"},\"type\":\"OpenApiConnection\",\"inputs\":{\"host\":{\"connectionName\":\"shared_sharepointonline\",\"operationId\":\"GetItems\",\"apiId\":\"\/providers\/Microsoft.PowerApps\/apis\/shared_sharepointonline\"},\"parameters\":{\"dataset\":\"https:\/\/azurepscred.sharepoint.com\/sites\/Projects\",\"table\":\"541ff279-bf94-4f6b-a46f-633047d11cd2\",\"`$top\":100},\"authentication\":{\"type\":\"Raw\",\"value\":\"@json(decodeBase64(triggerOutputs().headers['X-MS-APIM-Tokens']))['`$ConnectionKey']\"}}}}}},\"schemaVersion\":\"1.0.0.0\"}" } "@ Invoke-RestMethod -Method POST -Uri $URLsend -Headers $headers -Body $BodyJsonsendMost of the code is the same as before that I used to retrieve a list of all the workflows. You can refer to the entire payload reference here: https://docs.microsoft.com/en-us/power-automate/web-api
Here, I will explain what I am doing up top. As can be seen the clientdata property holds the escaped JSON. Other values are:
- category – 5 means it is one of the instant, scheduled or automated flows. Please refer to the Web API reference link I posted above for other values
- statecode – 0 means it will be turned off when created. Use 1 for the flow to be switched on when created
- type – 1 means is a flow. I am not entirely sure what this means though because the document is not quite clear. It states the following
Indicates if the flow is a running flow, or a template that can be used to create additional flows. 1 – flow, 2 – activation or 3 – template.
https://docs.microsoft.com/en-us/power-automate/web-apiI am not sure what 2 activation means in the above but I will dig further and see if I can make sense of that. However, for our purpose, we can just use 1 as the value for type.
Once the script executed, I could see my new flow created using just PowerShell. Remember, this technique is not just for PowerShell. The only reason I used PowerShell is it allows me to quickly learn and test techniques to clarify the foundational and the fundamentals. You could probably even use PostMan or Fiddler or SFPX web part.

Note: for now this only works for default environment under Solutions. Any flows saved under “My Flows” will not work.
This has opened up possibilities to be able to use code for some of the flows, especially repetitive work such as changing the action inputs. You can also use this API to modify the flow. Some of the things that I am wresting with right now is how to get it to work with solutions other than the “Default Solution”.
-
How to get a list of flows attached to a list?
Today a client emailed me that they are receiving multiple notifications for when an item is created in SharePoint. Having implemented that flow, I knew I had created one, but there were two more notifications that were sent. Left scratching my head for just a moment that which of the flows should I start looking at first to find which one might be sending those extra notifications.
However, the efforts of the good folks at Microsoft 365 CLI team came to the rescue. I ran the following PowerShell to conclude that there was just one flow attached to the list.
        $accessToken = m365 util accesstoken get --resource "https://TENANTNAME.sharepoint.com" --new -o text
        $Header = @{
                    "Authorization" = "Bearer $($accessToken)"
                    "Accept"        = "application/json; odata=verbose"
                    "Content-Type"  = "application/json; odata=verbose"
                }

        $RESTEndPoint = "https://TENANTNAME.sharepoint.com/sites/SITETITLE/_api/web/lists/getbytitle('LISTTITLE')/SyncFlowInstances"

        $flowObjects = Invoke-RestMethod -Uri $RESTEndPoint -Headers $Header -Method POST
The above will return results and if you examine $flowObjects.d.SynchronizationData that will have a JSON array of objects with the different flows attached to the list. In my case I had just one.
I can understand flows not having the ability to save as draft or publishing (although, not quite but yeah) but there is just no reason in today’s age to not have a way for us to identify what flows are attached to a list from the UI in SharePoint.
-
Automating Power App source extraction – First Attempt
PowerApps PowerShell and Power Platform CLI do not yet (to the best of my knowledge) provide a way to download the msapp file directly. But, Power Automate does. I created a simple flow using actions from “Power Apps for Makers”. I am still playing with the commandlets such as Get-PowerApp and Get-AdminPowerApp to see if there might be a way to construct this download.
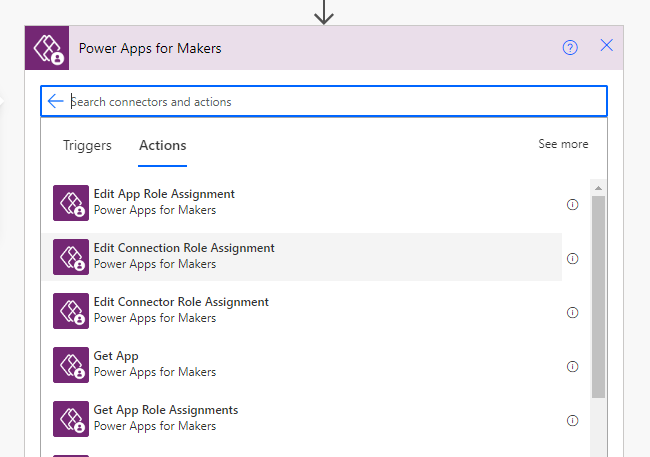

The flow gets the app. I provided the GUID of the app I wanted. To retrieve the GUIDs, I used the Get Apps action. You can just get this from the UI too. The return of the Get App action provides the URL that can be used to request the Power App msapp file. Following shows the output of the Get App action.

Using, PowerShell I decided to automate this a bit to save time when doing this on a regular basis. Following is some quick PowerShell I put together. It uses Power Platform CLI to pack/unpack the files so download that first from here: https://docs.microsoft.com/en-us/powerapps/developer/data-platform/powerapps-cli
function GetPowerAppFile {
    param(
    [string]$appName,
    [string]$rootPath
    )

$wc = new-object System.Net.WebClient
$downloadFile = $wc.DownloadFile("https://pafeblobprodam.blob.core.windows.net/2022,"c:\users\testuser\downloads\$appName.msapp")

if(-not(Test-Path -LiteralPath "$rootPath\$appName")) {
    try {
        new-item -Name $appName -ItemType Directory -Path $rootPath -ErrorAction Stop

            UnPackPowerApp -appName $appName -rootPath $rootPath

    }
    catch {
        Write-Error -Message "Error while unpacking "$rootPath\$appName". Error was: $_" -ErrorAction Stop
    }
}
else {
    Write-Error "Directory for the app already exists"
}

}

function UnPackPowerApp {
    param(
        [string]$appName,
        [string]$rootPath
        )
pac canvas unpack --msapp "$rootPath\$appName.msapp" --sources "$rootPath\$appName"

}

function PackPowerApp {
    param(
    [string]$appName,
    [string]$rootPath
    )
pac canvas pack --msapp --msapp "$rootPath\$appName.msapp" --sources "$rootPath\$appName"

}
To get the msapp file, I call the function like below
GetPowerAppFile -appName "NewAppTesting" -rootPath "c:\files"This would create a directory under the root path provided with the same name as what you provide for the appName argument. Once all the changes are done, Pack the file using the following command:
PackPowerApp -appName $appName -rootPath $rootPathFrom what I can read in the documentation, there is a command to publish the app. I think that can be automated after we have the re-packaged msapp file; however, I have not yet tried it. I will try that and post back later.
-
How to bulk edit formulas in Power Apps
I will make this a quick how to type post without getting into too much commentary. Time is a precious resource and we need to get things done. I have numerous thoughts on the why, the how, the ifs of this approach but that would be for another article.
To get started, Install the Power Platform CLI from here:
https://docs.microsoft.com/en-us/powerapps/developer/data-platform/powerapps-cli
For the purpose of this article, I put together a simple canvas app with one formula to show the functionality.

Go into File > Save as > This computer and save the file. This will generate the file with msapp extension. Once downloaded, run the following Power Platform CLI command
pac canvas unpack --msapp "App.msapp" --sources "App"
The above unpacks the msapp file and is fairly easy to understand. –msapp points to the msapp file and –sources points to a folder in the current directory where the files will be extracted.
The extracted files look like the following:

There are folders related to data sources, connections, etc. Explore around and explore the art of the possibilities. In my case, the directory of interest is the “Src” directory. The “Src” will have file for our Screen1 called “Screen1.fx” which is a YAML file. The controls and their formulas will have been deserialized into this YAML file. Mine looks like this:
Screen1 As screen:

    TextInput1 As text:
        Default: ="Text input"
        Width: =327
        X: =440
        Y: =216
        ZIndex: =1

    TextInput1_1 As text:
        Default: ="Text input"
        X: =109
        Y: =216
        ZIndex: =2

    TextInput1_2 As text:
        Default: ="Text input"
        X: =447
        Y: =159
        ZIndex: =3

    TextInput1_3 As text:
        Default: ="Text input"
        X: =109
        Y: =159
        ZIndex: =4

    TextInput1_4 As text:
        Default: ="Text input"
        X: =447
        Y: =100
        ZIndex: =5

    TextInput1_5 As text:
        Default: ="Text input"
        X: =109
        Y: =100
        ZIndex: =6

    TextInput1_6 As text:
        Default: ="Text input"
        Fill: =RGBA(251, 188, 159, 1)
        X: =447
        Y: =40
        ZIndex: =7

    TextInput1_7 As text:
        Default: ="Text input"
        Visible: =varVisible
        X: =109
        Y: =40
        ZIndex: =8

    Button1 As button:
        OnSelect: =Set(varVisible,true);ClearCollect(testColl, ["Val1","Val2"]);
        Text: ="Button"
        X: =380
        Y: =296
        ZIndex: =9
Let’s make a change. I changed the default values for all the textboxes, Fill color for one of the textbox, added a new value to the collection in Button1 OnSelect, changed the X-axis placement for a control. The possibilities are endless as all the properties are exposed (or most of them anyway because I have not explored every single property in there).
This is what the changed YAML file looks like:
Screen1 As screen:

    TextInput1 As text:
        Default: ="Enter Name"
        Width: =327
        X: =440
        Y: =216
        ZIndex: =1

    TextInput1_1 As text:
        Default: ="Enter Address"
        X: =109
        Y: =216
        ZIndex: =2

    TextInput1_2 As text:
        Default: ="Enter DOB"
        X: =447
        Y: =159
        ZIndex: =3

    TextInput1_3 As text:
        Default: ="Enter Email Address"
        X: =109
        Y: =159
        ZIndex: =4

    TextInput1_4 As text:
        Default: ="Enter Comments"
        X: =447
        Y: =100
        ZIndex: =5

    TextInput1_5 As text:
        Default: ="Enter Feedback"
        X: =109
        Y: =100
        ZIndex: =6

    TextInput1_6 As text:
        Default: ="Enter Employee ID"
        Fill: =RGBA(168, 0, 0, 1)
        X: =887
        Y: =40
        ZIndex: =7

    TextInput1_7 As text:
        Default: ="Text input"
        Visible: =varVisible
        X: =109
        Y: =40
        ZIndex: =8

    Button1 As button:
        OnSelect: =Set(varVisible,true);ClearCollect(testColl, ["Val1","Val2","Val3"]);
        Text: ="Changed from Power App Source"
        X: =380
        Y: =296
        ZIndex: =9
Let’s save the file and pack the contents into mspp using the following Power Platform CLI command
pac canvas pack --msapp "App.msapp" --sources "App"
Let’s upload it back to Power Apps. Go into File > Open > Browse and choose your packed file. In my case it was App.msapp

After importing the file, my Power App looked like this:

Perfect! I see my control has moved, the fill color changed, the default text replaced and the button control on select has changed as well.
You can even change data sources. Screen order can be changed in the Canvasmanifest.JSON file. If your Power App calls a Power Automate flow those references will also be included in this package. You can also change the theme. However, my recommendation would be to create the theme before even starting any work on the app. Ready the theme, get sign from the business, and then use that as a starting point for a new app.
Perhaps one of the biggest advantages is to be able to now check in source code for the Power App.
If you look at the structure of the YAML file, I’d be inclined to say you can even use just this file to define further controls without even having to open Power Apps Studio. However, I have not tried this but I will and let everyone know if if it worked to add a new screen with controls.
In all honesty, this feature has got me all excited about Power Apps.
Thank you Power Platform CLI team. This is great. It opens up opportunities to actually use the source files to be able to make changes on the fly as well as make changes in bulk that has been such a strong pain point in Power App adoption, at least for me.
-
How to build a UI for PowerShell Scripts
Building a user interface for PowerShell scripts is a good way to create reusable scripts and even sharing it with other admins. One good use that I have found for this is to share the script with system admins who might otherwise not be familiar with how SharePoint object model (CSOM or REST) works, but would have global admin privileges at the tenant, or be in the on-premises farm administrators group.
If all the script does is call REST endpoints then this approach can even be used to share scripts with site owners.
A few more considerations would be whether the script itself executes using app only policy or executes in the user context. For example, the script below uses a script deployed to the M365 tenant and API permissions assigned is “Sites.FullControl.All”. Because the script uses an app context (application level permission instead of delegated permission), the script can still be shared with site owners who would not have global admin roles or even SharePoint admin roles at the tenant level.
Just to be more clear, the script below assumes that you would have already authenticated and authorized using PnP. That part is not shown in the script but would be needed before calling Invoke-PnPSPRestMethod.
In this example, I have a form where the user specifies the new site title, new site URL, and the type of site to create. Once the button “Create Site” is clicked, the process starts. From an end user’s perspective there is no PowerShell code exposed. To do that, create a shortcut with code like below:
cmd /c start /min "" powershell -WindowStyle Hidden -ExecutionPolicy Bypass -File "c:\users\owner\documents\powershell_gui.ps1"
Add-Type -AssemblyName System.Windows.Forms


	$buttonCreateSite_Click={
        $siteTypes = @{
        'Communication' = 'SITEPAGEPUBLISHING#0'
        'Team with Group' = ''
        'Team without Group' = ''
        }

        $siteTypeSelected = $siteTypes[$ddlSiteType.SelectedItem]
		$RestEndPoint = "https://azurepscred.sharepoint.com/_api/SPSiteManager/Create"

        $body = @"
                {
                   "request":
                   {
                    "Title":"$($txtBoxSiteTitle.Text)",
                    "Lcid":1033,
                    "ShareByEmailEnabled":false,
                    "Url":"$($txtBoxUrl.Text)",
                    "Classification":"",
                    "Description":"",
                    "WebTemplate":"$($siteTypeSelected)",
                    "WebTemplateExtensionId":"00000000-0000-0000-0000-000000000000",
                    "HubSiteId":"00000000-0000-0000-0000-000000000000",
                    "Owner":"owner@azurepscred.onmicrosoft.com"
                    }
                }
"@

            $response = Invoke-PnPSPRestMethod -Url $RestEndPoint -Method POST `
            -ContentType "application/json;odata=verbose" -Content $body
	}

$Form = New-Object system.Windows.Forms.Form
$Form.Text = 'Create SharePoint Site'
$Form.Width = 700
$Form.Height = 400
$Form.BackColor = [System.Drawing.ColorTranslator]::FromHtml("#336699")
$Form.ForeColor = [System.Drawing.ColorTranslator]::FromHtml("#FFFFFF")

$txtBoxSiteTitle = New-Object System.Windows.Forms.TextBox
$txtBoxSiteTitle.Width=500
$txtBoxSiteTitle.Height = 50
$txtBoxSiteTitle.Location = New-Object System.Drawing.Size(125,20)

$lblSiteTitle = New-Object system.windows.Forms.Label
$lblSiteTitle.AutoSize = $true
$lblSiteTitle.Text = "Enter Site Title"
$lblSiteTitle.location = new-object system.drawing.size(10,20)


$Form.controls.Add($lblSiteTitle)
$Form.Controls.Add($txtBoxSiteTitle)

$txtBoxUrl = New-Object System.Windows.Forms.TextBox
$txtBoxUrl.Width=500
$txtBoxUrl.Height = 50
$txtBoxUrl.Location = New-Object System.Drawing.Size(125,50)

$lblSiteUrl = New-Object system.windows.Forms.Label
$lblSiteUrl.AutoSize = $true
$lblSiteUrl.Text = "Enter Site Url"
$lblSiteUrl.location = New-Object system.drawing.size(10,50)

$Form.Controls.Add($lblSiteUrl)
$Form.Controls.Add($txtBoxUrl)

$ddlSiteType = New-Object System.Windows.Forms.ListBox
$ddlSiteType.Items.Add("Communication")
$ddlSiteType.Items.Add("Team site connected to groups")
$ddlSiteType.Items.Add("Team site without group")
$ddlSiteType.location = New-Object system.drawing.size(125,80)
$Form.Controls.Add($ddlSiteType)


$btnCreateSite = New-Object system.windows.Forms.Button
$btnCreateSite.add_Click($buttonCreateSite_Click)
$btnCreateSite.Text = 'Create Site'
$btnCreateSite.Width = 200
$btnCreateSite.Height = 30
$btnCreateSite.Location = New-Object System.Drawing.Size(125,180)
$btnCreateSite.AutoEllipsis
$Form.controls.Add($btnCreateSite)

$Form.ShowDialog()
Now that have seen how to create it by hand, such an approach is probably not practical where there are more controls to be added. PoshGUI was an online tool that provided WYSWYG editor for free. However, it is now paid – but it is very cheap and worth considering paying for.
Another approach could be to use Visual Studio to create the form layout and look at the generated source code and convert that to PowerShell syntax.
-
Subscribe
Subscribed
Already have a WordPress.com account? Log in now.
